Sunday, May 29, 2016

RayTango19 is Twitching


Our fellow host, Joe of the Geeks Amok Podcast, is live streaming his game play right now on Twitch!

Check out his Stream now: RayTango19 on Twitch.tv

Friday, May 27, 2016

Memindahkan aplikasi ke SDCard pada Windows Phone 10

Assalamualaikum. Wr. Wb. Bro/Sis
Bagi pengguna windows phone 10. Bilamana penggunaan aplikasi sudah menghabiskan kapasitas penyimpanan internal, maka solusinya adalah memindahkan aplikasi ke Sdcard. Berikut adalah langkah-langkahnya.

Memindahkan aplikasi ke sdcard di windows phone 10

Untuk memulai pemindahan aplikasi ke sd card. Buka menu pada windows phone, lalu cari menu penyimpanan. Kemudian pilih.


Nanti akan ada rincian kapasitas pada perangkat windows phone 10 nya. Nah untuk memindahkan aplikasi ke sd card, tentunya pilih dulu aplikasi yang ada di penyimpanan internal.pilih pada "perangkat ini".


Nanti akan terlihat rincian data penyimpanan yang telah digunakan. Untuk memindah ke sdcard. Pilih "aplikasi dan permainan".


Akan terlihat rincian aplikasi yang telah terinstall di perangkat internal di windows phone 10. Pilih saja pada aplikasi yang diinginkan, nanti akan muncul menu pindah. Jika sudah arahkan ke sdcard, dan tekan pindah


Nah selesai deh, akan tetapi jika anda ingin membuat default aplikasi terinstall langsung masuk ke sdcard, ada opsi untuk itu, buka saja di menu penyimpanan seperti diatas, lalu scroll kebawah, tinggal ganti saja target tempat penyimpanannya.


Jika sudah maka tiap install aplikasi langsung diarahkan ke sdcard .

Ok itu aja bro/sis.

:)

Ganti Wallpaper, tema dan Warna Navbar pada windows phone 10

Assalamualaikum. Wr. Wb. Bro/sis.
Bosan dengan tampilan wallpaper default dari windows phone, anda dapat menggantinya di pengaturan tampilan. Anda bisa mengganti wallpaper lockscreen, wallpaper layar depan, warna navbar dan transparansi.

Mengganti wallpaper lockscreen

Untuk mengganti wallpaper lockscreen buka pada pengaturan lalu pilih Personalisasi, lalu pilih layar penguncian. Berikut adalah pengaturan wallpaper layar penguncian.


Pilih pada latar belakang. Nanti akan ada beberapa pilihan tergantung aplikasi yang diinstall. Defaultnya adalah gambar saya, gambar contoh dan bing.


Untuk bing. Gambar diambil melalui server windows, sehingga membutuhkan koneksi data. Dan berubah2 secara berkala.

Mengganti wallpaper homescreen

Untuk mengganti wallpaper di home screen, buka pengaturan lalu Personalisasi, lalu pilih mulai. Dan berikut adalah pilihan menu nya.


Disini anda dapat mengganti wallpaper, mengubah style menjadi win8 (gambar ubin) atau win 10 (gambar layar penuh). Selain itu anda juga dapat mengatur transparansi ubin di pengaturan "mulai" ini.

Mengganti warna tema dan navbar

Untuk mengganti warna navbar, menunya bisa dibuka pada pengaturan -> Personalisasi -> warna. Berikut adalah tampilannya


Disini anda dapat mengganti style gelap atau terang. Lalu menu dibawahnya anda dapat memilih warna untuk tema windows phone 10 anda.


Untuk mengganti warna navbar cukup aktifkan saja "terapkan warna untuk bar navigasi". Berikut adalah contoh hasil utek-utek wallpapernya.


Yah lumayan lah jadi tambah seger kalau warna dan tampilan wallpapernya bisa disesuaikan dengan suasana hati :p, btw jangan dibandingkan dengan android yang bisa di customize jadi apa saja. :p

Ok itu aja. :)

Wednesday, May 25, 2016

Cara mereset windows phone 10

Assalamualaikum. Wr.wb bro & sis
Jika anda ingin menjual atau membeli "second" atau bekas sebuah windows phone versi 10, tentunya hal yang pertama dilakukan adalah backup dan mereset ponsel wp nya. Nah bagi yang bingung mereset wp 10. Dibawah ini adalah step-stepnya.

Reset Windows Phone 10

1. Buka pengaturan atau setting


2. Buka sistem


3. Buka tentang


4. Lalu scroll kebawah pilih atur ulang telepon anda


Selanjutnya. Akan ada notifikasi. Dan opsi untuk menghapus file di internal sd card. Jika sudah lanjutkan saja hingga hp windows phone 10 restart. Nanti akan muncul icon gear dan garis loading. Tunggu saja hingga selesai. Jika sudah maka windows phone 10 sudah kembali ke pengaturan pabrik.

Selesai :D

Episode 064: Civil War


The 64th show of the Geeks Amok Podcast is done and is officially in the history books!

LeRoy, Frank and Joe discuss the geek news! Follow us on Twitch and Subscribe on YouTube!
Read more »

ROM | Moto X Play | 6.0.1 | Marshmallow v2.0 | Baseada na Stock | MPD24.107-52

Que tal uma  ROM baseada na Stock para seu Moto X Play?


Características:

- Baseada na Firmware Indiana XT 1562 MPD24.107-52
- Deodexada
- Roteada
- Framework do Xposed integrado
- Busybox
- Stock Kernel

Aplicativos Removidos:

/app
EditorsDocs.apk
EditorsSheets.apk
EditorsSlides.apk
NoiseField.apk
PhaseBeam.apk
Translate.apk
Video.apk
YouTube.apk

/priv-app
3c_ota.apk
BodyGuardApp.apk

Aplicativos Adicionados:

/app
TCommander.apk

Instalação:

1. Baixe a ROM
2. Coloque na memória interna do seu Moto X Play;
3. Reinicie no modo Recovery;
4. Vá em Wipe > Advanced Wipe e selecione: System, Cache, Data e Dalvik-Cache;
5. Confirme o Wipe;
6. Vá em Install e selecione a ROM e confirme;
7. Agora vá em Reboot > System

Downloads:

Marshmallow v2.0

Outros:

Fix do Led

Stock Fonte

ROM | Moto X2 | 6.0.x | CyanPop Oficial v6.4

Conheça a CyanPop para o seu Moto X 2014!

Características:

- CyanPopOTA
- Android 6.0.1_r30
- CyanPop bootanimations
- All CM features
- CyanPop Extras
- Superuser status bar icon hide
- Long press back to kill configurable timeout
- Add ability to disable bar color in battery saver mode
- Nav bar tweaks + HW keys tweaks
- Status bar color option
- Statusbar clock font style
- Second Clock
- Statusbar clock font size
- SlimDim
- Double tap to sleep on navigation bar
- Navigation bar button color
- Full screen recents
- Battery Bar
- Pie Control
- Volume Steps
- Slim Doze
- Notification color inversion
- Network traffic indicator
- Time-context headers to the notification header
- Weather Temprature on Status Bar
- Statusbar weather color
- Status bar weather font style
- Statusbar weather font size
- LockscreenWallpaper: Use FB's WallpaperCropper
- Lockscreen see-through & blur
- Disable Lockscreen Media Art
- Camera sound toggle
- Settings: Battery saver & low battery notification toggles
- Disable Immersive Messages
- Force Expanded Notifications
- Settings: less notifications sound
- Profiles: option to disable lock screen device policy override
- 45 second timeout option for Screen, Dream and Lock timeouts
- Controller for in-call proximity sensor
- Launch LockClock from settings
- Gesture Anywhere
- Headset icon switch
- Allow disabling of FC dialogs
- Hide power menu on lockscreen
- App sidebar
- Lockscreen shortcus
- App Circle Sidebar
- OmniSwitch
- AOKP custom system animations
- Double tap to sleep anywhere on the lock screens
- And more...

O que funciona:

- Boots
- Rede
- Wifi
- Bluetooth
- Camera
- Vídeo
- Audio
- Sensores
- Flash
- Led

O que não funciona:

- Diga-me

Instalação:

1. Baixe a ROM e o GApps;
2. Coloque ambos na memória interna do seu Moto X;
3. Reinicie no modo Recovery;
4. Vá em Wipe > Advanced Wipe e selecione: System, cache, data e dalvik-cache;
5. Confirme o Wipe;
6. Vá em Install e selecione a ROM e confirme, depois selecione o GApps e confirme;
7. Agora vá em Reboot > System

Mudanças:

- Veja aqui

Downloads:

CyanPop v6.4 | Victara
Os últimos são os mais atuais

Open Gapps

Root | MotoX2 | 5.1/6.0 | Tutorial Completo de Como Fazer Root no Moto X 2° Geração

Aprenda o passo a passo de como fazer Root no seu Moto X 2° Geração!

Somente para Moto X 2° Geração!

Esse processo realizará a perca de sua Garantia!

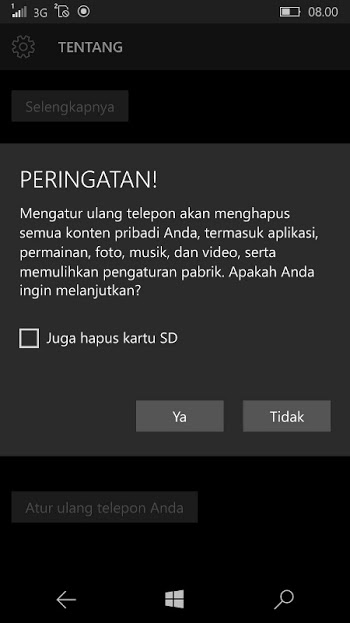
Faça um backup de toda sua memória interna pois ela será apagado ao Desbloquear o Bootloader!

____________________________________________________________________________________________________

Parte 1: Desbloqueando o Bootloader

Essa é a primeira etapa, precisamos desbloquear o Bootloader para fazer grandes alterações na raiz, onde vamos colocar um Custom Recovery!

Requisitos:
Clique neles para realizar o download

- Arquivos mFastboot e ADB
- Boa carga na bateria (+ 60%)
- Drivers USB instalados
- Backup - irá perder seus dados

Tutorial:

1. Baixe o "Arquivos ADB e mFastboot" e extraia;
2. Segure "Shift" e clique com o botão direito do mouse sob a pasta e selecione "Abrir janela de comando aqui"


3. Logo após ele irá abrir um Prompt;
4. Desligue o aparelho e ligue em Fastboot (Power + Volume baixo por 5s)
5. Conecte o aparelho no PC pelo USB;
6. Agora vamos abrir o site da Motorola para realizar o desbloqueio (Link aqui)
7. No site, role até o final e clique em "Continuar assim mesmo"
8. Depois ele irá pedir para fazer Login, eu fiz pelo Google+ para ser mais prático;
9. Agora vamos pegar seu código do Bootloader!
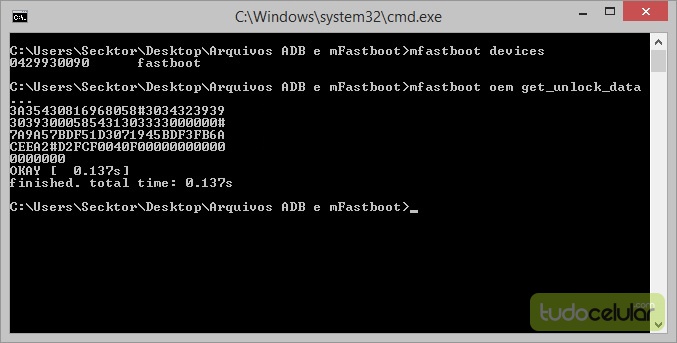
10. No Prompt que você abriu vamos colar as seguintes linhas:

Código:

mfastboot devices

mfastboot oem get_unlock_data

11. Logo pós lançar esse código ele vai retornar com 5 linhas que vai ser o código do seu bootloader;


12. Abra um bloco de notas, copie as 5 linhas do código no Prompt e cole no Bloco;
13. Para gerar o código de desbloqueio, você vai precisar colar junto as 5 linhas de saída em uma cadeia contínua sem "bootloader" ou espaços em branco. A linha que você envie-nos seria:


14. Após colocar linha por linha, clique em "Can my device be unlocked?";
15. Se ele for aceita, ele irá pedir solicitação para ler um termo e você confirma "yes"
16. Após isso ele irá enviar o código de desbloqueio para seu Email cadastrado;
17. Logo após receber o código vamos formar a linha pra colocar no Prompt;

Código:

mfastboot oem unlock KEY

Exemplo: fastboot oem unlock 2HUJLJ7903JDOT7HDTE5

18. No lugar de "KEY" você coloca o código que você recebeu no email;
19. Após enviar o código seu dispositivo será desbloqueado e irá ser Reiniciado!

Observação:

- No Android 5.1 foi implementada uma opção de segurança que protege o bloqueio do bootloader, então se você estiver com a resposta:
"Check 'Enable OEM Unlock' in Developer Options."
- Basta ligar seu aparelho, desbloquear a opção de Programador na configuração, abrir o Programados e marcar a opção "Desbloqueio de OEM"

______________________________________________________________________________________________________

Parte 2: Instalando Recovery TWRP

Agora vamos colocar um Custom Recovery, ele realiza múltiplas funções como, Instalação de Custom ROM (CyanogenMod), Backup de todo o sistema e restauração, limpeza profunda, etc.

Requisitos:
Clique neles para realizar o download

- TWRP Recovery 3.0.2-1 Victara

Tutorial:

1. Baixe o TWRP e extraia em seu PC;
2. Reinicie seu Moto X e modo Fastboot (power e volume menos por 5s)
3.  Conecte no USB;
4. Abra o Instalador.bat
5. Vá dando Enter quando pedir
6. Após concluir a instalação, pegue seu Moto X e selecione "Recovery"com volume p/ cima na tela do Fastboot;
7. Após abrir o Recovery você seleciona Reboot e depois System, na hora que der o Reboot ele vai fazer uma pergunta...
- Ele irá perguntar se você vai fazer Root, caso queira, faça o "Swype" para confirmar.
8. Depois que Reiniciar o Moto X, verifique se você possui Root, caso tenha não precisa realizar a parte 3.

_____________________________________________________________________________________________________

Parte 3: Instalando Root!

Após a instalação do Recovery vamos usar ele pra instalar o Arquivo de Root para seu Moto X!

______________________________________________________

Android 5.x:

Requisitos:
Clique nele para realizar o download

- Arquivo Root (SuperSU v2.65)

Tutorial:

1. Baixe o arquivo mas NÃO EXTRAIA e coloque no Armazenamento do seu Moto X2;
2. Desligue o aparelho e ligue em Fastboot, depois vá em "Recovery" e confirme com "Volume Up";
3. No TWRP, vá em Install, depois escolha o Arquivo .zip do Root;
4. Agora confirme fazendo o "Swype" para instalar;
5. Depois vá em Wipe > Advanced Wipe e selecione Dalvik / ART Cache e confirme;
6. Após a instalação, dê Reboot > System!
7. Pronto!

__________________________________________________________

Android 6.x:

- Para fazer Root no Android 6.0 clique aqui

Agora seu Moto X 2° Geração esta Roteado!

Tuesday, May 24, 2016

App | Gerenciador de Arquivos Lenovo

Um ótimo gerenciador para seu Android, extraido do Moto G 4 Geração!


Esse é o Gerenciador de Arquivos feito pela Lenovo presente no Moto G 4 Geração, aparentemente gostei muito dele e atendeu todos os meus requisitos!

Screenshots:


Download:

Gerenciador de Arquivos Lenovo

Créditos:

Monday, May 23, 2016

Stock Rom Meizu M2 Note For SP Flash Tool

Firmware Meizu M2 Note For Flashing Or Unbrick Via SPFlashTool if  Update Recovery Always Bootloop.


Firmware Meizu M2 Note Download
Password: Download

Read more »

Saturday, May 21, 2016

Wednesday, May 18, 2016

Now Playing In The Google Play Store


The Geeks Amok Podcasts can all be found in the Google Play Store as of the beginning of the this month. Feel free to subscribe!

Geeks Amok


Sith Yourself


Geek Out With Your Tech Out


Monday, May 16, 2016

Call Out To Our Fans


The Geeks Amok crew is looking for opinionated fans of the show who want to have their voice heard. We built this network for fans to interact and eventually start joining the show(s) as a guest. Here is your chance to prove us wrong, yell at us, make us laugh or cry and even suggest topics for the show.

We are in the process of restructuring the shows and getting back in the flow of things. We got lazy and everyone knows how that is.

Please fill out the Feedback forms for all of the shows you listen to. Everyone who fills out the feedback forms, has a chance to win a $50 Amazon Gift Card (must provide an email address on the form, not publicly made available.) and be heard on future shows. Feel free to email us video or audio recorded messages at GeeksAmok@gmail.com.

Link to Feedback forms.

Thanks for your continued support!

LeRoy, "Geekmeleon" Otterson