Resurrection Remix Nougat no seu Moto X Play!
Características:
- Based On Latest Google Android 7.1.1_r12 release
- RR Customizations:
- Statusbar customizations
- Brightness Slider
- Enable/Disable Show Notification Count
- SuperUser Indicator Switch
- Double Tap To sleep Statusbar
- Carrier Label
- Carrier Label Switch
- Carrier label Color
- Carrier Label Size
- Clock Customizations
- Time & date
- Day & date Toogle
- Center/Right/Left Clock Choice
- Date Format
- Clock Font Styles
- Battery
- Battery Bar customization
- Battery Icon Customization(circle/landscape/Potrait and more)
- Battery % Text
- Network Traffic Indicator
- Network Traffic Arrows Switch
- Incoming/OutGoing Traffic
- Network traffic Color
- Statusbar RR Logo
- RR logo Color
- RR logo Position
- Custom Logos
- Custom logo logo Color
- Custom logo Position
- Custom logo Style
- StatusBar Weather
- Weather Color
- Weather Position(left/right)
- Weather Font Style
- Weather Size
- StatusBar Ticker
- Ticker Text color
- Ticker Icon Color
- Animations
- Toast Animations
- ListView Animations
- System Animations
- Power Menu Animations
- Misc Animations
- Gestures
- Gestures Anywhere Feature
- 3 Finger Swipe Screenshot Gesture
- App Circle Bar
- Choose apps in AppSidebar
- Trigger Width
- Trigger Hieght
- Trigger Position
- App Sidebar
- Choose apps in App circle
- Trigger Width
- Trigger Hieght
- Trigger Position
- Pie Customizations
- Pie Trigger(left ,Right ,Bottom)
- Pie Targets
- Pie Colors
- More Pie Features
- Recents Panel
- Clear All button Switch
- Clear All Tasks Switch
- Clear All Button Location(Top right,Top Left,Top Center,Bottom Left,Bottom Right,Bottom Center)
- Full Screen Recents
- Recents Styles
- OmniSwitch
- Cclock Widget
- CLock And Alarm Customizations
- Weather Panel Customizations
- Calender Events
- Enable/Disable Navbar
- Navbar Button Customization smartbar
- Navbar Pulse
- Navbar Fling
- Double Tap To sleep navbar
- LockScreen Customizations
- Lockscreen Bottom Shortcuts
- Lockscreen General Shorcuts
- 100+ Icons for Shortcuts
- Double Tap to Sleep Lockscreen
- Lockscreen Media Art/Enable Disable
- Quick PIN/Patter Unlock
- LockScreen Wallpaper
- Lockscreen Weather Widget
- Lockscreen Icons Color
- Quick Settings Draggable Tiles
- Customizable Tiles
- Dyanamic Tiles Adjustment
- Number of columns/rows
- Tile Animations
- Notification Drawer
- LongPress Toogles to Enter Settings
- Disable Immersive Mode Messages
- Force Expand Notification
- Quick PullDown
- Smart Pulldown
- Notification Panel Transperency
- Volume Dialog Transperency
- Notification Panel Stroke
- Volume Dialog Stroke
- Buttons
- Backlight Timer
- Backlight Strength
- Advanced Reboot Menu
- Power Menu Customizations
- Power Off
- Reboot(Recovery, Bootloader, Hot Reboot)
- ScreenShot
- Power Menu End Calls Switch
- Restart SystemUI
- Airplane Mode
- ScreenRecord
- On the Go Mode
- Sound Panel
- Home Button(For devices with HW keys Only)
- Home Button answer call
- Long Press Actions
- Double Tap Actions
- Menu Button(For devices with HW keys Only)
- Short Press Actions
- Long Press Actions
- Search Button(If Device Supports)
- Short Press Action
- Long Press Action
- Volume Buttons
- Wake Up Device
- Playback Control
- Ringtone Volume Control
- Keyboard Cursor Control
- Swap Buttons on Landscape mode
- Volume Key Answer
- Miscellaneous
- Selinux Switch (Switch Between Permissive and Enforcing Selinux if Device has Selinux Enabled)
- cLock Shortcut
- Disable Battery Saver Warning Color
- Cammera Shutter Sound Enable/Disable
- SystemUI Tuner Icon Settings
- Enabled By default
- Removed Demo mode and Tweaked SystemUI Tuner As compared To AOSP
- StatusBar Icons Cuzomizations
- Quick Settings Customizations
- Other Features
- Perfomance Profiles
- LCD Density
- Expanded Desktop Mode
- Heads Up Switch and customizations
- Live Display
- Configurable 0,90,180,270 Degree Rotation
- Lock Screen Autorotate Switch
- Native Tap to Wake From Marshmallow
- Double Tap Power Button To enable Camera gesture
- Prevent Accidental Wakeup
- Wake Phone on Charging Plug
- Battery Light Customizations
- Notification Light Customizations
- Font Size
- CM privacy guard
- Performance Tweaks(Kernel Aduitor Inbuilt)
- CM root inbuilt
- RR OTA
- A Whole new RR Configurations
- OverAll Smoothness Improvements
- Optimizations to Improve Battery
- Includes All Android Nougat Features
- Includes ALL CM14.1 Features
- E muito mais!
Instalação:
1. Baixe a ROM e o GApps;
2. Coloque ambos na memória interna do seu Moto X;
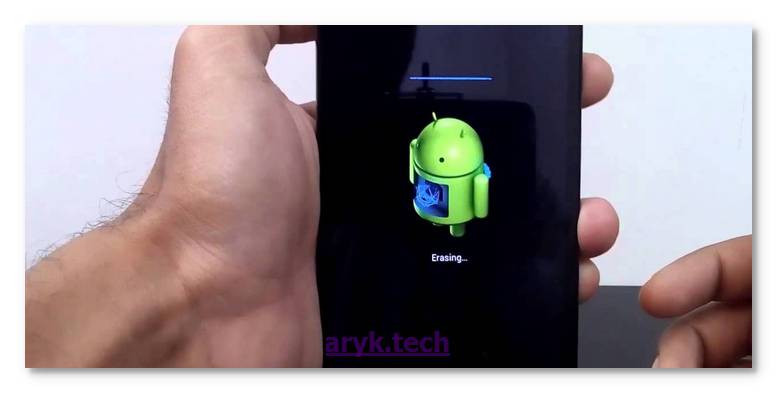
3. Reinicie no modo Recovery;
4. Vá em Wipe > Advanced Wipe e selecione: System, cache, data e dalvik-cache;
5. Confirme o Wipe;
6. Vá em Install e selecione a ROM e confirme, depois selecione o GApps e confirme;
7. Agora vá em Reboot > System
Downloads:
Resurrection Remix 5.8.1 | 03/02
Dynamic Gapps
Créditos:


![[ROM] IOS9 For FlareS4 Screenshot 1](https://blogger.googleusercontent.com/img/b/R29vZ2xl/AVvXsEhdq9HGLMK7SlC8dgaaF05qI21mt0-O7eOsQgNkk71_34SdlD9M9ms5chbGdbWBSmNU448w9OJcnJypvzAoQqs__K0CyDmmDKmtLV7U-3gHh9SfQxeZX2SH09IPRA98Ar5HenPFV5bAcsf8/s1600/IOS9-Flare4.jpg "[ROM] IOS9 For FlareS4")
![[ROM] IOS9 For FlareS4 Screenshot 2](https://blogger.googleusercontent.com/img/b/R29vZ2xl/AVvXsEjwA6DD4ED_r9iKuU1SX6NRWgvs8h-Fp_ns59tN8Y67aMtBtr0Aqb8fjuJOKp9p0U3AjXcMlaUVeHRaQW3XomBoUQHAlftOHYrU595NMmFzzKD99kp9fya5tGfCqoigMiVWCdrOL0T-b6az/s1600/IOS9-Flare4.3.jpg "[ROM] IOS9 For FlareS4")
![[ROM] IOS9 For FlareS4 Screenshot 3](https://blogger.googleusercontent.com/img/b/R29vZ2xl/AVvXsEi5E1dn5vQk4oK5wsc3bVbZgIDuC4F2BRPvWQCFRaVH4tinvRSOfz8BVXJkjG87lyNEKZpgWM62sr1S6qarrPAGwYXjqp_wVMxWfR4Ihe-0hguqFWA99xq-fzOitSjfaxQi8QkxpO2lLfLh/s1600/IOS9-Flare4.5.jpg "[ROM] IOS9 For FlareS4")
![[ROM] IOS9 For FlareS4 Screenshot 4](https://blogger.googleusercontent.com/img/b/R29vZ2xl/AVvXsEizy0dlrU7x5TmUkTdMZRUhs00r2NXfJhm0DBYXveuyQhyphenhyphen4RMDiQyHXwTogaqbRnAtyg35ZS5PzRy48DCQxcVrBqJusG0vJCTKzNBTkaQ0R_V-EhVrbjwf2ytQ3e_PP4cXqhnYc1GP4u_OF/s1600/IOS9-Flare4.6.jpg "[ROM] IOS9 For FlareS4")
![[ROM] IOS9 For FlareS4 Screenshot 5](https://blogger.googleusercontent.com/img/b/R29vZ2xl/AVvXsEisDgHrNxPkhC2EX6Z9MmZqVfA7uMekYQbdg0aNWnJTGMuFezRKCJal0Cg5p6NGAfnrlTevpqUIQazwd7j-VGdOxo45dCZbfqS7U2UildLG13Wt42RzGFtlvZseM9pd0rtHjUbHvpXphQ_5/s1600/IOS9-Flare4.4.jpg "[ROM] IOS9 For FlareS4")
![[ROM] IOS9 For FlareS4 Screenshot 6](https://blogger.googleusercontent.com/img/b/R29vZ2xl/AVvXsEiqMgKZtTpQ2Z8HZJYjzNulLSkqrvq1moxkNWII0TstyBZVUsWybLEq3Vetqnx9th8G5o390Z04626Z6lWGvQVZP7OTEorF-UuKaSeXW1ouRIzcp2aqYFhrrx4v4I0xyhW3XeO9SRFRTCrT/s1600/IOS9-Flare4.2.jpg "[ROM] IOS9 For FlareS4")
![[ROM] IOS9 For FlareS4 Screenshot 7](https://blogger.googleusercontent.com/img/b/R29vZ2xl/AVvXsEiLUDXAycjD9Mir9ef4sBT1ekJ1Ciawo7RvNj-KiIA-XEHmH8Hmn2b1B09hf83xEFT1zzssB1p-a3TqN294_Ed2OhAveem-4-M-g7otq3jx01dGJSzLxnMzSWq1qUWbSczLixyhx7uHxA-H/s1600/IOS9-Flare4.1.jpg "[ROM] IOS9 For FlareS4")