Saturday, December 31, 2016

[ROM] Asus Zenfone 2 Untuk Andromax EC

Feature:

  • Battery Saver is optimal
  • Gaming Mode always On
  • Fix Storing photos on sdcard
  • Better Performance
  • Update portion Asus Applications
  • Applications can open MySmartfren
  • Already strong signal
  • Dolby Sound Effect

Screenshot: Sorry can't provide.

Bugs:

  • USB Mass Storage (still under Editing)
  • Etc. (Find and fix another equally)

Tutorial:
  1. Download ROM Asus Zenfone Modification "Update February 2, 2016"
  2. Sign Into CWM (By pressing the buttons Vol + and Power buttons at the same time) In case of HP Shutdown (Off)
  3. Click Wipe Data
  4. Click the Install Zip (select File Asus Zenfone ROM Modification)
  5. Wait Process installan
  6. Reboot to System

Thanks And Credit: Cararoot (For ROM) Adjie Kurniawan (Modif) Allineone-bloggers

Friday, December 30, 2016

Analyst Claims Apple to Launch iPhone X with Wraparound Display

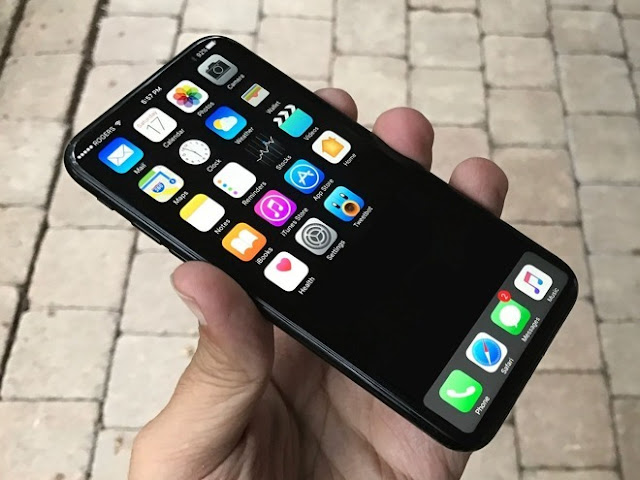
Every year, there never seems to be a shortage of leaks or tips regarding Apple’s latest iPhone. And today, analyst Timothy Arcuri of Cowen and Company has claimed, citing sources from Apple’s supply chain, that the company plans to launch three new iPhone models in late 2017, headlines with what he claims to be called the iPhone X.

iPhone X Image 1

According to Arcuri, the iPhone X will feature 5.8-inch OLED display that wraps around the entire front of the device and curves down to all the edges and corners. With the display covering all of the front of the device, it’s been rumored that the earpiece, FaceTime camera, and Touch ID fingerprint sensor will be set into or under the OLED display.
In spite having a display that covers the entirety of the smartphone’s front side, it’s been rumored that the usable portion of the display will actually be smaller. We’ll have to wait and see if any of these reports and rumors are true to truly find out what to expect from Apple’s new series of iPhones this year.

More Details of the Nintendo switch Surface


Nintendo played their cards pretty close to their chest when announcing the Nintendo Switch. They revealed only a few of its features and game lineup in 2017. 
Knowing humans, this immediately heralded a ton of speculation ranging from the features of the console-- its processor, RAM, battery life, touchscreen capabilities-- to what games will be available at launch.
But we may have more information now as a video posted by OBE1Plays on YouTube seems to have revealed a whole lot of hitherto unknown info about the Switch. 
The video was uploaded while he was chatting with Let’s Play Video Games’ Laura Kate Dale, who has in the past been pretty good with her Nintendo-related rumors.
So on to what was discussed. According to the duo, the Switch’s battery life will likely be around 3 hours, although the fact that it via USB-C means it will charge quickly. It was also mentioned that it is to come with 32GB of built-in storage, and microSD cards will let gamers expand that to 128GB. The left Joy-Con controller is also rumored to feature a “Share” button that lets users share screenshots and gameplay footage with friends or upload it to social media platforms.
Now on to the games that may be released at launch, it was said that some of the Triple A games like Mass Effect et al might not feature on the Switch. It remains to be seen which games WILL feature and more details will most likely be provided soon.
You can see the video below.


Why the iPhone 7 might have already defeated the upcoming Galaxy S8


2017 is coming and with will come it's own fair share of amazing gadgets and high end flagship phones. 
Another reason why next year is so special is that it is also supposed to usher in a new generation of processors, which in turn is supposed to make for faster, more powerful phones. 
There's a downer here though and that is the results of the first leaked benchmark for the next-generation Qualcomm Snapdragon 835. It is troubling as the implications are that Samsung's Galaxy S8 might not even be as powerful as this year’s iPhone 7 and if next year's Samsung phone can't compete with this year's Apple, what hope does it have for next year?
This is not to say that Samsung have always had an edge over Apple or anything as history has shown us that usually Apple phones do better in real-world performance tests. 
While we already covered the AnTuTu benchmark, another one from Geekbench shows that the iPhone 7 is king and processes faster than any Android phone in existence at the moment.
Next year’s Android chips will be built on 10nm process technology and under normal circumstances you'd hope this means that they should be able to outperform the older A10 Fusion chip in the iPhone 7. Well, it seems you'd be wrong, just see below.
qualcomm-snapdragon-835-geekbench-benchmark
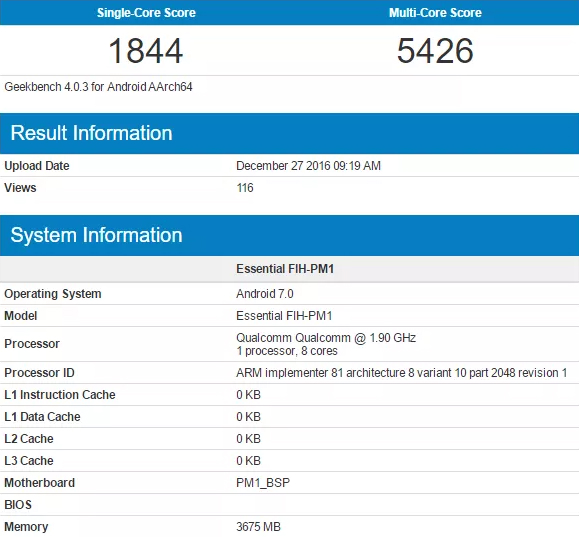
According to Phone Arena, a leaked Geekbench test of the Snapdragon 835 that’s going into the Galaxy S8 shows a single-core score of 1844 and a multi-core score of 5426. That might seem impressive, but that’s still not as impressive as the iPhone 7, which has an average score of around 3300 in single-core and about 5400 in multicore tests.
Worse still, the purported single-core Snapdragon 835 score is actually doable by some current Android devices. That’s a bit concerning and could indicate that Qualcomm and Samsung still have a long way to go until they catch Apple.
Now we can't be sure these are the real tests and even if they are, it is also possible that the Snapdragon 835 is incomplete. But if it is real, then one can genuinely say Samsung might have to mind the gap.

Thursday, December 29, 2016

How To Root and Install CWM Recovery on Lenovo A369i

Today im going to teach you on how to root and Install CWM Recovery on Lenovo A369i

Lenovo A369i Image 1 Front and Back View
Easy Root Lenovo A369i Without PC
  • Download Framaroot 1.9.0. After you have successfully downloaded the APK to your device, install it just like any other app. You might need to enable “Unknown sources” (Settings> Security > Unknown sources) if the app won’t install.
  • Now head back to your App Drawer and look for an Addition of App “FramaRoot“.
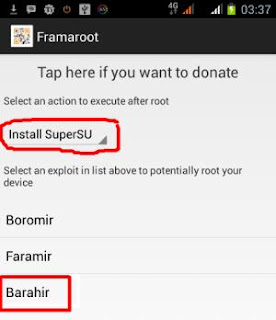
  • launch the Framaroot app, select an action to execute after root
  • Select install “SuperSU
  • Select an exploit in list above to potentially root your device as “Boromir or Barahir” and proceed further.


Framaroot image 1
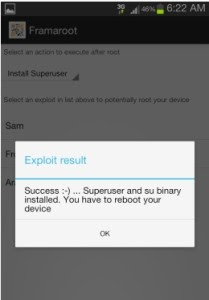
  • Now, you will be able to see the Framaroot success Message on the Phone Screen.

Image 2

  • Then reboot/restart your Device.
  • Once the process is done means you have successfully rooted your device.
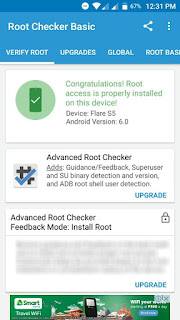
Viola! That's it your Lenovo A369i is now rooted to check if its successful download this Root Checker on Google Play Store.


How To Install CWM On Lenovo a369i
  1. Download recovery.img and put it to the root of your SD Card
  2. Install MobileUncle MTK Tools from play store.
  3. Once installed, launch it from your App Drawer.
  4. Backup your IMEI. Just click IMEI BACKUP RESTORE (MTK) (if you need to restore just repeat the process and click the restore button and it will fix Invalid IMEI issues)
  5. Select “Recovery Update” from the menu.
  6. The tool will search your SDcard automatically and find you “recovery.img” file. Select the recovery under “Recovery file in SDCard”.Click “OK”
  7. It will ask you if you want to reboot into recovery. Click Ok to confirm that your phone boots in CWM recovery.

Samsung Mimicking Apple Again? Wireless in-ear Headphones for S8 rumoured


Samsung and Apple are probably going to go down as one of the greatest rivalries ever with both companies habitually improving or mimicking each other in terms of innovations.

It seems that we have another one with the Airpods. Apple released the AirPods, complete with a proprietary W1 chip that lets them instantly connect to an iPhone or iPad and now fresh rumours are suggesting Samsung will produce its own pair of wireless in-ear headphones. It's not clear if they will be bundled with the phone, or sold separately.

The S8 (one of the most anticipated things of 2017) will like the iPhone 7 reportedly get rid of the 3.5mm headphone jack, and use instead a USB Type-C for audio. 

It is believed that the USB Type-C audio allows for higher quality audio to be passed through a wired connection. But because it will use USB C, you won't be able to connect your current headphones, so you'll either have to get a pair that will use the bespoke connection, or get a wireless Bluetooth pair.


It is also rumoured that the new earphones will use Harman audio technology following Samsung's acquisition earlier this year for $8 billion, but we don't know this for sure.


Other features, such as one to rival Apple's W1 chip, haven't been confirmed either, so we'll just have to wait and see.

How to use the Prometheus software to Downgrade / Upgrade to Any Unsigned iOS Version


Prometheus, the tool that allows downgrade or upgrade to an unsigned iOS firmware, has been released and this news has gotten a lot of techies excited especially with all the possibilities it promises. 


So how do you use it? The first thing to note is that you must have your SHSH2 blobs saved for the firmware version you are downgrading or upgrading to. If you haven’t saved your SHSH2 blobs already then go do so.

The next thing you'd need to note is that the tool works on 64-bit devices at this moment in time
 and support for iPhone 7 and iPhone 7 Plus is somewhat broken. 

So knowing that you can move forward. It's not all gloom though as support for more devices is on the way

So what Prometheus will let you do is to upgrade from iOS 9.x to iOS 10.x with ease, and within different versions of iOS 9.x. However, you cannot downgrade from iOS 10.x to iOS 9.x. If you were planning on doing so, then you might want to put things to rest. 

And finally of note is that Prometheus works for both jailbroken and non-jailbreak devices, which is huge!

And lastly (seriously) is that it's only available for the Mac at the moment, but not to fear, Windows and Linux versions will be out soon enough.


Check out the tutorials below and soon you'll be a pro at upgrading or downgrading your device. I think it is necessary to note though that if you have no idea how this works or what this is, you should seriously consider giving a pro so as not to damage your iOS device.


Wednesday, December 28, 2016

Huawei Executives Arrested For Allegedly Leaking Internal Info to LeEco

Unconfirmed reports from China say that Huawei has arrested six of is mid-level and top executives in the consumer business division for allegedly leaking sensitive internal information to LeEco. Those arrested are said to include some of Huawei’s product designers. The exact information leaked to LeEco wasn’t stated, but it may interest you to know that the six executives arrested were said to no longer work with the company as at the time of their arrest.

Huawei Image 1

In a swift manner, LeEco whose name is mentioned in the debacle has responded that it did not receive any information from the arrested individuals but admitted that there are some patent disputes between both companies. LeEco has also issued a notice of its intention to take legal actions. The cause of the dispute is said to likely be related to two recent LeEco patent filings, one for children’s smartwatch and another for an antenna design which Huawei considered as an infringement of its patent. But LeEco claims the six individuals upon leaving Huawei, did not carry along any documents or drawings. Perhaps the accused executives cross-carpeted to LeEco from Huawei, but we are not sure about that.


Tutorial | Moto X Style | Fazendo Root no seu Moto X Style | RƔpido, fƔcil e seguro!

FaƧa Root no seu Moto X Style de uma forma fƔcil, rƔpida e segura, tudo isso graƧas a Junior Passos!

Advinha quem esta com um Moto X Style? EntĆ£o...
Agora vocĆŖ nĆ£o precisar mais esquentar sua cabeƧa caƧando tutoriais de como fazer Root!

Requisitos:

- Boa carga na bateria (50%+)
- Bootloader desbloqueado
- TWRP Recovery

Tutorial:

- Para desbloquear o bootloader basta utilizar este tutorial
- Para instalar o TWRP Recovery basta utilizar este tutorial

1. FaƧa o download do zip no final do post e coloque no armazenamento do seu Moto X Style;
2. Entre no modo Recovery TWRP;
3. VĆ” em install, procure pelo arquivo zip do Root e instale;
4. Depois vĆ” em Reboot System;
5. Pronto, seu Moto X Style jĆ” esta roteado!

Notas:

- No arquivo zip do Root temos o kernel modificado para funcionar o SuperSU, e tem tambƩm compatibilidade com script init.d!
- HƔ tambƩm a logo do bootloader Motorola, para remover aquele aviso chato de bootloader desbloqueado!

Downloads:


Root XT1572

CrƩditos:

New details on Galaxy S8 Exynos 8895 Processor Emerge


So with the Samsung S8 coming out next year, it's only natural that rumours of what it will look like and what is under the hood will surface and now is no exception.
According to online reports, some more details about the Galaxy S8’s Exynos 8895 processor have surfaced out of China today.
According to the report, two variants of the Galaxy S8 Exynos chip will be produced, the Exynos 8895M and Exynos 8895V. The two are said to be manufactured on Samsung’s 10nm FinFET technology. They are said to use a combination of four Exynos M2 CPU cores clocked at 2.5 GHz or 2.3 GHz based on the variant and four Cortex A53 CPU cores clocked at 1.7 GHz.
The report also claimed that Samsung is going to use ARM’s latest Mali-G71 graphics processor with this chipset. The Exynos 8895M is said to feature a 20-core GPU while the 8895V may feature an 18-core GPU. Both are said to be compatible with UFS 2.1 storage, Cat.16 LTE modem, and LP-DDR4x RAM.
None of all that was said above has been confirmed by Samsung, so it's advisable to take it all with a tablespoon (or bag) of salt. We await Samsung to confirm and deny these new reports.

ROM | Moto X | 6.0.1 | Team OctOS Oct-M R3 | 26/10 | Ghost


- OctOS Ć© avaliada como uma ROM estĆ”vel, e Ć© adequada para o uso diĆ”rios, por ser estĆ”vel, pode haver alguns erros desconhecidos. A equipe em desenvolvimento nĆ£o Ć© responsĆ”vel por qualquer dano ao seu dispositivo.

InstalaĆ§Ć£o:

1. Baixe a ROM e o GApps;
2. Coloque ambos na memĆ³ria interna do seu Moto X;
3. Reinicie no modo Recovery;
4. VĆ” em Wipe > Advanced Wipe e selecione: System, cache, data e dalvik-cache;
5. Confirme o Wipe;
6. VĆ” em Install e selecione a ROM e confirme, depois selecione o GApps e confirme;
7. Agora vĆ” em Reboot > System

MudanƧas:


Downloads:

Oct-M Release 3 | 26/10

Banks Gapps

CrƩditos:

- Team OctOS

ROM | Moto X | 6.0.x | DU Dirty Unicorns 10.6 Final | Ghost | 25/12

Stay Dirty!

Sobre a DU

"Dirty Unicorns Ʃ um projeto open source que comeƧou sem nome.
Foi um projeto que comeƧou baseado em A0KP nos tempo do Jelly Bean. No comeƧo era apenas o trabalho de um homem em um dispositivo, o EVO 3D. Desde entĆ£o muitos outros se juntaram ao projeto que cresceu exponencialmente.

NĆ³s tivemos muitas contribuicƵes talentosas com o nosso projeto. Grandes ou pequenas, o foco sempre foi contribuir com a comunidade. Enfim, Ć© por isso que fazemos o que fazemos. Antes do Jelly Bean, nĆ³s decidimos usar uma nova base, a OmniRom. Enquanto a AOKP era divertida, a 0mniRom provou ser ainda mais excitante, pois nos desafiou a ver do que Ć©ramos capazes de fazer com um projeto que tinha diferentes objetivos em mente. NĆ³s aprendemos muito e novamente tivemos novas contribuiƧƵes. Com o Lollipop, mudamos para a base AOSP com muitos patchs do CAF para fazer nossos antigos dispositivos funcionarem como deveriam. Crescemos e aprendemos ainda mais.

Atualmente estamos trabalhando em releases contĆ­nuos do Android M e as coisas nĆ£o poderiam estar melhores. Tem sido uma experiĆŖncia de aprendizado incrĆ­vel e ainda nĆ£o acabou! Continuamos aprendendo e seguindo em frente a cada dia.

Por fim, nĆ³s NAO ACEITAMOS, ou pedimos por doaƧƵeo. NĆ£o acreditamos nisso. Tudo que Ć© necessĆ”rio para manter este projeto vem do nosso prĆ³prio bolso. Gerrit, Jenkins, Websites, dispositivos, etc. NĆ³s nunca vamos pedir um centavo. Tudo que pedimos Ć© que tenham paciĆŖncia, procurem, leiam e tentem aproveitar o processo conosco!!"

MudanƧas:

v10.6:
- Update to Android 6.0.1_r68
- Lots of translations
- Configurable Themes tile components to apply
- Switch to HTTPS for our updater
- Add missing exposures and separate power dialog icons
- A lot of Gallery2 improvements/fixes
- Rewrite DU-About a little
- Fix lockscreen charging current switch
- Statusbar icons transparency
- A lot of Gallery2 improvements/fixes
- A lot of FMRadio improvements/files
- Refactor SlimSeekBarPreference
- Expose new hard coded colors for themes in Messaging
- Add vector image and fix themeing issue in Messaging
- Fling trails width configuration
- Update bcm4356 FW
- Use HTTPS when fetching changelogs
- DocumentsUI fixes
- Account for time changes when showing recent activities
- Increase max screen recording time to 1 hour
- Allow force landscape mode with screenrecord
- Bump DU Certified to 2.4.1
- Misc CMTE fixes that came in with CMSDK refactor
- Update Fling library from Orange Open Source to 1.2.6
- Display bluetooth battery status when available
- Added hardware key disable support with M adaptations
- OmniSwitch: launcher: change essentials launch intents
- OmniSwitch: revert recent apps should not change order in quick switcher
- OmniSwitch: no ripple no fun
- Make overlay permission check configurable
- Fix Slim Recents unknown window type error

InstalaĆ§Ć£o:

1. Baixe a ROM e o GApps;
2. Coloque ambos na memĆ³ria interna do seu Moto X;
3. Reinicie no modo Recovery;
4. VĆ” em Wipe > Advanced Wipe e selecione: System, cache, data e dalvik-cache;
5. Confirme o Wipe;
6. VĆ” em Install e selecione a ROM e confirme, depois selecione o GApps e confirme;
7. Agora vĆ” em Reboot > System

Downloads:


DU 10.6 | 25/12

Minimal GApps

CrƩditos:

- kn06497

ROM | MotoX | 6.0.x | Resurrection Remix 5.7.4 | Oficial | 27/12

Essa Ć© a Resurrection Remix nĆ£o oficial, desenvolvida por Rafael Julio!

Somente Moto X 1ĀŖ GeraĆ§Ć£o!

CaracterĆ­sticas:

- Barra De NavegaĆ§Ć£o
- enable / Disable Navbar
- BotĆ£o PersonalizaĆ§Ć£o da Navbar
- DimensƵes da Navbar (Potrait e Paisagem)

- Barra De Status
- Brightness Slider
- Habilite / Desabilite Contagem de NotificaĆ§Ć£o
- Interruptor de Indicador SuperUser
- Etiqueta Carrier
- Carrier RĆ³tulo Cor
- PersonalizaƧƵes do relĆ³gio
- Tempo e data
- Centralizar / Direita o relĆ³gio
- Bateria
- PersonalizaĆ§Ć£o da Bateria
- ƍcone personalizado da Bateria (cƭrculo / paisagem / Potrait e muito mais)
- Indicador do trƔfego de rede

- Theme Chooser
- AnimaƧƵes
- ListView Animations

- Gestos
- Recurso de gestos em qualquer lugar

- Circle Bar
- Escolha Aplicativos no cĆ­rculo App
- Trigger Largura
- Trigger Hieght
- PosiĆ§Ć£o Trigger

- Clock Widget
- RelĆ³gio e alarme personalizaƧƵes
- Tempo

- Perfis de Perfomance
- Densidade do LCD
- Modo de Ɓrea de Trabalho Expandida
- Todos New CM Ɓudio FX App
- Heads De personalizaƧƵes
- Quick Unlock
- OtimizaƧƵes para melhorar a bateria
- Todas as caracterĆ­sticas da CM12
- E muito mais!

InstalaĆ§Ć£o:

1. Baixe a ROM e o GApps;
2. Coloque ambos na memĆ³ria interna do seu Moto X;
3. Reinicie no modo Recovery;
4. VĆ” em Wipe > Advanced Wipe e selecione: System, cache, data e dalvik-cache;
5. Confirme o Wipe;
6. VĆ” em Install e selecione a ROM e confirme, depois selecione o GApps e confirme;
7. Agora vĆ” em Reboot > System

Downloads:


Resurrection Remix 5.7.4 | Ghost

Minimal Gapps

Via: XDA
CrƩditos: abinsur279

Tuesday, December 27, 2016


The Google Pixel has had its fair share of problems in recent times with their flagship phone. Recently it was reported that there was some sound distortion when the phone reaching the top three decibel bars.
Now another problem has reared its ugly head with some users reporting that the smartphone appears to be affected by an early shutoff bug in which the phone would die even with some battery power left, and the only way to get it operational again would be to plug it into a charger.
On the website Reddit, some Pixel owners have complained of this problem. A user by the name of vrski_15 said, “My Google Pixel (32 GB), less than a month old is facing worrisome battery issues. Twice in last 5 days, has the phone shutdown abruptly while I am in middle of something. In both instances, battery was between 25-35%, and the phone under normal conditions should have lasted for at least next 3-4 hours.”
“I ignored it the first time, when happened couple of days ago, but today I run into the same issue. I am on a business trip in India, and the customer service wasn’t really helpful. All they could come up was that I should factory reset my phone and wait for it to happen again, and then visit them.” This problem seems to be faced by other Pixel owners, although thankfully it doesn’t seem to be too widespread at the moment.
The actual problem is unknown and it seems Google hasn't said anything about it. It is hoped that it doesn't become too widespread before something is done about it.

How to root Flare S 5 using SPFT and flash custom recoverys

Flare S 5 root success screenshot
This detailed tutorial teach you on how to root and flash custom recovery in Cherry Mobile Flare S5.
This method is using SPFT, so it necessary to use Desktop or Laptop and working USB cable.


Requirements:
PC /LAPTOP
USB CABLE
WINDOWS 7, 8, 10
 
 Download and extract:
Note: Do it at your own risk!
Rooting can void your warrant.
First thing to do:
  • Backup your phone.
  • Self Confident
Procedure:
 Instructions
1. Download all necessary files and Enable USB Debugging mode in your phone..
2. Install Drivers USB_VCOM_Driver.rar
In Device Manager Right click on PC name(Right Side) and then click on Add legacy hardware as shown in image below.

Driver installation Screenshot 1
Now in Add Hardware Wizard click on Next » Install the Hardware that i manually select from a list (Advanced) » Show All Devices » Next » Have a Disk, Now select the any inf file from where you extracted the downloaded VCOM driver package.

Mediatek Preloader Screenshot

3.  Now Click on Next and select Install this driver software anyway and wait for finishing the process.

Install Driver Screenshot
You can follow this step :
"How to flash using WINDOWS 8"

4.  After installation is finished then Restart your computer, That's it.
5. Open flash_tool.exe, click on the Download Tab
 Extract the downloaded recovery to the new folder you created.
Flash Tool Screenshot

6. Click Scatter-loading and browse for the scatter file (MT6753_Android_scatter)
7. For Bootloop only
 Make sure flashing mode is set to "Download Only" and  unmarked all except Recovery.
Flash Recovery in SPFT Screenshot
8. Click Download.
9. Turn off your phone, connect your phone to the PC and wait for the flashing to commence.
10. Green Circle image with check will show once flashing is completed. That's it!

11. Important: Disconnect your phone from the computer, press and hold Vol Up + Power.
12. Boot menu will show, select Recovery.


From the custom recovery (CWM), it is recommended to backup your phone first, before rooting.


To root:
1. Reboot your  phone then press and hold Vol Up + Power On
 the CWM Recovery , click Install zip.
Install via zip
2. Choose zip from storage/sdcard1
install via zip


3. Select BETA-SuperSU-v2.79.zip.
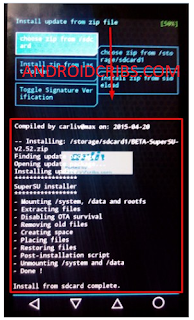
superSu install
 4. Tap Yes Install SuperSU-v2.79.zip.
Install super su Screenshot 2

5. Flash it, no need to wipe cache. Wait to finish. Once completed then reboot!
Install super su Screenshot 3

4. Enjoy your rooted  Flare S 5 Recovery.


Credits:
Aron Jhed Bautista Amiscosa
Noxxious in Needrom

How to fix Bootloop Cherry Mobile Flare S5

This tutorial learn how to fix bootloop Cherry Mobile Flare S5
Also the purpose of this is to revive your voided warranty and revert back to original OS, Partition,
Recovery, Logo and etc.
This fulldump stockrom also have Dolby good for sound management.
In this instruction you need PC , Desktop or Laptop and working USB cable. Also this method works  Windows OS 7, 8, 8.1 and 10 only.


Requirements:
 Download all:

First thing to do:
  • Backup your phone. YOU WILL LOSE ALL YOUR DATA INCLUDING CONTACTS, MESSAGES, PHONE CALLS, APPS, ETC.
  • Self Confident
Procedure:
 Instructions
1. Download all necessary files and Enable USB Debugging mode in your phone..
2. Install Drivers USB_VCOM_Driver.rar
In Device Manager Right click on PC name(Right Side) and then click on Add legacy hardware as shown in image below.

Driver installation Screenshot 1
Now in Add Hardware Wizard click on Next » Install the Hardware that i manually select from a list (Advanced) » Show All Devices » Next » Have a Disk, Now select the any inf file from where you extracted the downloaded VCOM driver package.

Mediatek Preloader Screenshot

3.  Now Click on Next and select Install this driver software anyway and wait for finishing the process.

Install Driver Screenshot
You can follow this step :
"How to flash Stockrom using WINDOWS 8"

4.  After installation is finished then Restart your computer, That's it.
5. Open flash_tool.exe, click on the Download Tab
 Extract the downloaded Flare S 5 stock rom to the new folder you created.
Flash Tool Screenshot

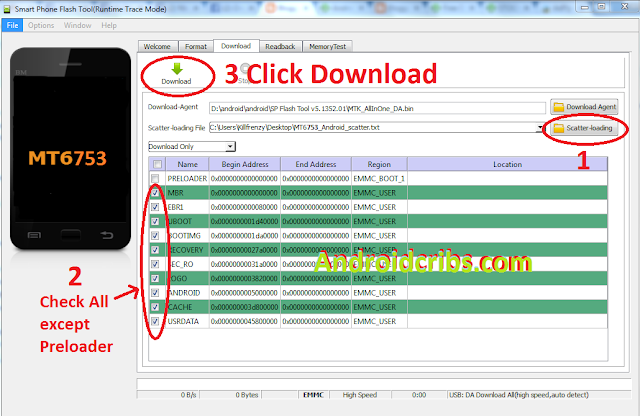
6. Click Scatter-loading and browse for the scatter file (MT6753_Android_scatter)
7. For Bootloop only
 Make sure flashing mode is set to "Download Only" and check mark all except Preloader.
Note: If deadboot/hardbrick set "Download+Format" and check Preloader.
8. Click Download.
Download SPFT Screenshot

9. Turn off your phone, connect your phone to the PC and wait for the flashing to commence.
10. Green Circle image with check will show once flashing is completed. That's it!

Success Flashing Stockrom Cherry Mobile Flare S5 Stockrom Screenshot

11. Disconnect your phone in USB cord then open if still bootloop then try to factory reset in recovery settings. To go in recovery mode reboot your phone hold and press power on and volume up simultaneously until recovery mode appeared.


Credits:
Glenn CaƱete Sandig  for Stock Rom